Tip for speeding up your work in Ligtroom: changing behaviour of your PC mouse buttons. You can use your PC mouse similarly like keyboard. Thanks to it you can save a lot of valuable time!
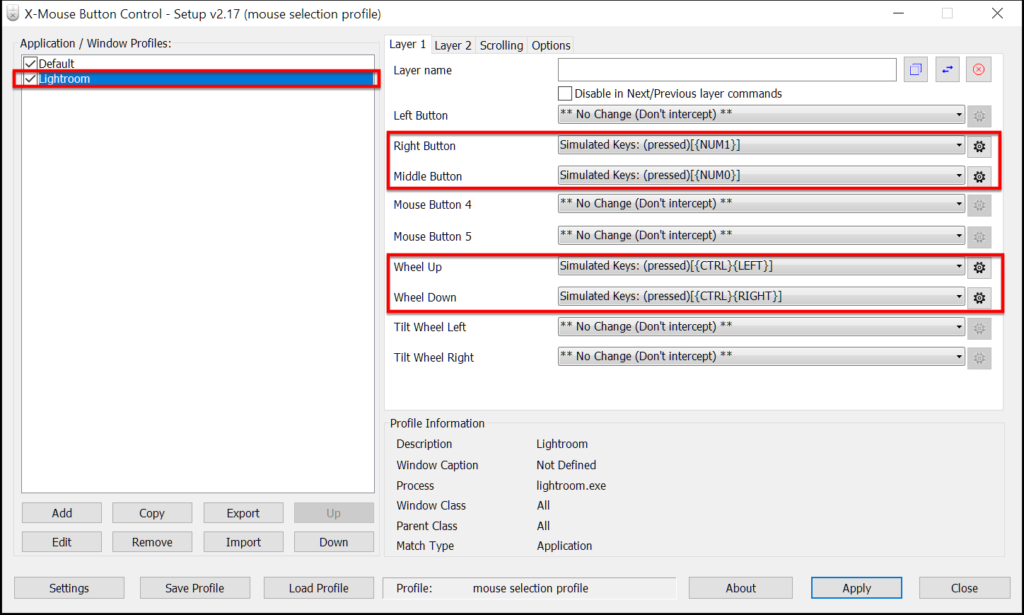
I use program X-Mouse Button Control to set my mouse button functions. The principle is that you can assign any keyboard shortcut (even a combination of keys) to each mouse button. For example, you can choose to press the right mouse button to get the same response as pressing the “1” key on your keyboard. You can limit this behavior to specific programs: in Lightroom, for example, the right mouse button will rate a photo with one star (just like you would press “1”), but in all other programs, the mouse will behave as you have been used to. Keyboard shortcuts can be selected not only for the mouse buttons, but also for the scroll wheel. The advantage is a huge speeding up of your work, I recommend to try it!
For your inspiration, I will show you two examples of how I customized my regular office mouse to speed up Adobe Lightroom.
Speeding up Photo Culling in Lightroom
Choosing photos from one wedding usually takes me a whole day of work, often more. It’s a lot of hours sitting at the computer. But… you can lie down! One day I brought my work to the next room, turned on the projector onto the wall (my eyes were grateful to me) and just lied down on the bed (my back was grateful to me). Because I don’t have a wireless keyboard, I just brought a bluetooth mouse with me and controlled the photo culling with this one mouse. How to do it?
Using X-Mouse Button Control, I mapped the mouse functions as follows:
- scroll up = press Ctrl + left arrow * (move to next photo)
- scroll down = press Ctrl + down arrow * (move to previous photo)
- right mouse button = numeric key 1 (one star rating)
- middle mouse button = numeric key 0 (correction of rating – no star)
* Note: Normally, it would be enough to omit the Ctrl key. However, Ctrl with the arrow is more secure as it will move to the next photo when, for example, the transition filter or crop mode is on – as in the following case.
Speeding up of Photo Cropping in Lightroom
What I use more often is the photo cropping mode. My workflow is such that firstly I create a selection of all photos, then for all selected photos I correct tilt and cropping (leaving the other adjustments intact for later), then I go again from the beginning and edit other things. So it is not that I completely edit one photo first and then going to other photos. My workflow allows me to fully focus on each individual treatment separately, and most of all I believe that croppiing all the photos together will save a lot of time – I do the same thing in a row, so I’m fast at it (one of the manufacturing production principles). Change of mouse behaviour helps me to be quicker:
- middle mouse wheel pressed = press R key (start / end crop mode)
- scroll up = press Ctrl + left arrow (move to next photo)
- scroll down = press Ctrl + down arrow (move to previous photo)
Default Mouse Settings
Once I have finished selecting and cropping the photos, I want to work normally with my mouse in Lightroom as normal. Therefore, I have set up a third mouse profile, which returns all functions to the default settings.
Automation of Wedding Photography Post Process
I believe that for wedding photographers knowledge of keyboard shorcuts and automation are very important. Wedding photographers often work with a large amount of photographs and must deliver them in a relatively short time. What about you? Do you know any technical tips to save time during photo edits? How far can we go today in automation of photo post process so that it does not much affect the final quality of the photos? I will be happy for any of your ideas in the comments section ;-)
Wedding Photographer's Blog » Post Processing in Wedding Photography
16. 4. 2020, updated 4. 8. 2023
Author: Wedding Photographer Prague - Petr Dolezal


Is there a way to assign wheel up and wheel down to tilt the photo when in crop mode? Also in Develop mode, these wheels to be assigned to raise or decrease exposure?
Hello Dimitrios. If you know any hot key, then it can be assigned to the mouse too.
If you click on Exposure label, then you can change exposure by +/- keys. So these keys +/- can be assigned to the mouse wheel too. If you change only exposure, you can go through multiple photos and use it without clicking on Exposure label again and again.
I don’t know any hot key for tilting. So I am not able to assign tilting to the mouse neither.
Thank you for the tips.
But personally I can’t be bothered with going through all the photos more than one time. I edit all the photos one by one.
Thank you for your message. Photo editing one by one can have both advantages and disadvantages, depending on your general workflow and number of photos you are processing. I edit thousands of photos each week and personally I prefer to do it by “assembly process”, because it saves me tons of time. More about this approach here: https://petr-dolezal.cz/en/post-processing-wedding-photo/sort-edit-many-photos/